This article provides an overview of how to use the tables feature in Microsoft Word. Specifically, this article will cover table elements, adding tables, adjusting and editing table sizes and cells, alignment, and table design.
By having a better understanding of how table elements function, you should be able to create, edit, and troubleshoot table errors.
What is a Table?
A table is a grid that you can put content (text, images) into. The primary reason for using tables is to format the content into a specific shape – such as aligning text.
Important Vocabulary:
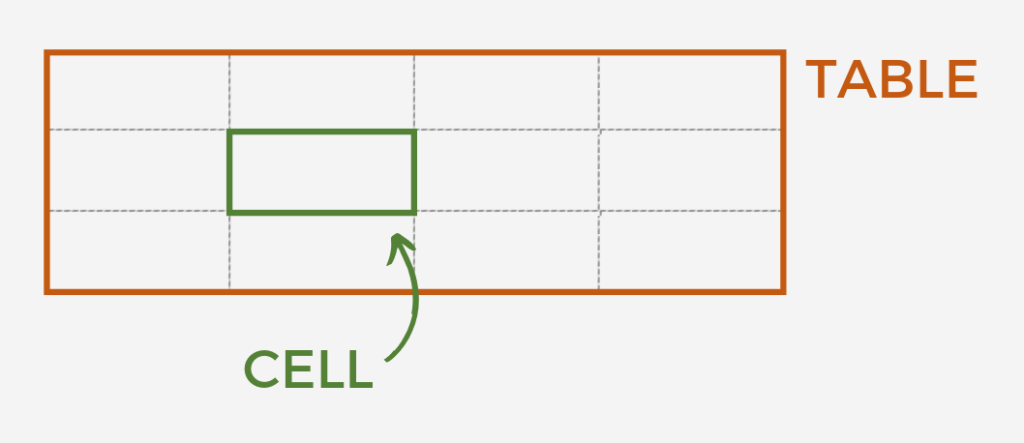
Table – A rectangular grid made up of multiple cells.
Cells – Individual blocks for which text or images can be placed. Together, cells make up a table.
Columns – Continuous line of cells running vertically. The number of cells across a table indicates the number of columns. Each column is only one cell wide.
Rows – Continuous line of cells running horizontally. The number of cells up and down a table indicates the number of rows. Each row is only one cell tall.
Word vs. Excel
Use tables in Word for organizing content visually. Tables help align text and images in a way that makes it easy to read and creates awesome layouts.
However, if you are interested in using a table for accounting, or to hold data for which you plan to make graphs, I recommend using Excel. The mathematical properties in Microsoft Excel far outweigh the capacity of a Word table.
Depending on your goal, you can create a database in Excel and then import it into Word. The new table will have similar editing functionality as other tables in Word.
How to Add Tables in Word
When adding a table to a Word document, it is less important to know how many columns and rows you need and more important to know where you want to put the table.
Place your cursor in the location you wish to place the table.
In your click the Insert tab. This will bring up all the elements you can insert into your document.
Click the Table button. This will bring a drop down that allows you to select how many rows and columns you want in your table. Use your mouse to highlight the number of cells you want in your table. You can see the size at the top of the grid (the first number is columns, the second number is rows).
Alternatively, you can click Insert Table below the grid and directly enter the number of rows and columns you want for your table.
Tables will default to the width of the page or available space. They will be inserted “In Line”, meaning there is text above and below, and the table moves with the content on the page.
Columns will default to be evenly spaced. Rows will default to be evenly spaced and the height of the body font in the document.
A new table will have no formatting, except for a black border between all cells and around the outside of the table.
New Table Elements
What are the boxes outside the table? Once a table has been inserted into your document, you will notice two boxes outside of the table.
The first box is in the upper left-hand corner of the table and has a cross of arrows. Clicking and holding this box will allow you to move the table to another part of the document.
The second box is in the bottom right-hand corner of the table. Clicking and dragging this box will allow you to resize the table.

Adding Content to a Table
Now that the table is created, it is time to add content to the table.
In the example below, I am making sure to add headers to each of the columns, as well as categories in the rows.
You can also add images to the inside of a cell by making sure your cursor is placed inside the cell you want to add the image to and then clicking the Insert tab, followed by Media.
Adding More Cells, Rows, and Columns
Let’s say I start adding my content and then I realize – I forgot to create a row for the outcome of my chart!
Adding cells is relative to the position of your cursor, so it is important to place your cursor in the correct cell.
In this circumstance, I want to create another row at the bottom of my current table.
Place the cursor in the bottom row. Then, double-click (right-click equivalent on a Mac) and there is a pop-up selection panel.
Hover over Insert, then select Rows Below. This will add one row below the row in which my cursor is placed.
If you want to add a row between two rows, place your cursor in one of the adjacent rows and select ‘above’ or ‘below’ as desired.
The same process can be used to add columns to a table.
Deleting Cells, Rows, and Columns
To delete a cell, row, or column, first place your cursor in the location of the cell, row, or column you wish to delete.
If you just want to delete the contents of a cell, highlight the cell and press the Delete button on your keyboard.
Otherwise, double-click on a cell and select the option Delete cells…
You will see a pop-up window that asks how you want to delete the cells.
You have four options:
- Shift cells left – This removes just one cell and moves all the cells in the row to the right of it to the left. It will cause a different number of columns in that row compared to the other rows in the table.
- Shift cells up – This removes just one cell and moves all the cells in the column below up one. It will cause a different number of rows in that column compared to the other columns in the table.
- Delete entire row – Removes an entire row in the table.
- Delete entire column – Removes an entire column in the table.
Adjusting Table Size
As mentioned above, clicking and dragging the bottom, right-hand, box will reshape the entire table, keeping the cells evenly distributed. This is the best way to adjust a table width without distorting a single column.
Here are more ways to shape tables in Word.
Resizing Entire Column
Columns can be resized individually by clicking on the border between the columns and dragging from side to side. Wait for the cursor to turn into two vertical lines with arrows facing away from each other. Then, click on the border and move your mouse to resize.
If you want to resize a column to a specific width, highlight the column and navigate to the Layout tab in the Ribbon. Click Cell Size drop down and enter the exact width in the provided fields.
Resizing Individual Cell Width
Unlike Excel, tables in Word allow you more flexibility for resizing individual cells.
To resize the width of a column for only one row, highlight at least one cell adjacent to the cells you are trying to resize. Then, follow the same instructions as above.
Redistributing Width of Multiple Columns
To resize some of the columns so they are all the same width, use the Distribute Columns tool.
Highlight the columns you want to be the same width. In the Ribbon, navigate to the Layout tab. Click Cell Size drop down and select Distribute Columns.

Resizing Entire Row
Similar to the instructions above, rows can be expanded upon individually or as a group.
Resizing Individual Cell Height
Unlike Columns, Row heights cannot be adjusted individually by cell. Cells in a single row will always be the same height.
Redistributing Width of Multiple Rows
Use the instructions above for columns, changing out rows as highlighted and selecting Distribute Rows.
Merging and Splitting Cells
Not all tables are an exact grid and you may need to combine or separate cells. Merging cells is when you select multiple adjacent cells and make them one cell. Splitting cells is when you take a single cell and divide it into multiple columns or rows.
To merge cells, first highlight the cells you wish to merge. Cells need to occur in the same row and/or column and be adjacent to each other.
Then, under the Layout tab, select Merge.
To split cells, place a cursor in the cell you wish to split. Under the Layout tab, select the Merge drop down and click Split Cells. A pop-up window will appear asking you how many rows and columns you would like to split the cell into. Enter the desired numbers and click okay.
Cell Alignment
The alignment inside a cell refers to how the text and/or images display in relation to the inner walls of the cell itself.
There are nine (9) different alignments within a cell based on two directions: side to side, and up and down.

As you can see in the image, cell content can be aligned to the right, left or center of the cell, as well as to the top, middle, or bottom of the cell.
Cell alignment can be set individually; cells of different alignment can be contained in the same table.
To set the alignment of a cell, simply place your cursor in the cell you want to change (or highlight multiple cells you wish to change together) and navigate to the Layout tab. Click the Alignment drop down and select your desired alignment.
Cell margins and cell spacing can also play a role in how content is aligned.
Table Design
This is definitely the fun part of creating a table. Creating tables in Word is all about making your content easy to read. This is where design comes in.
Preset Styles
The easiest way to style your table is to use one of the prebuilt table designs provided by Word. With a variety of styles, you can find something with helpful shading, header styles, and more!
To use a preset style, start by making sure your cursor is placed inside the table. Navigate to the Table Design tab. The options for preset styles is located in the band on the top. You can view more designs by clicking on the arrow button that appears to the left of the styles, or the down-arrow tab to open up all options.


Click on a style you like to see it in action. Don’t like it? Click the Undo button or click Command+Z on your keyboard. Or, just select another style.
Note: Presets will override existing styles or cell alignment.
You can also take a preset style to get you most of the way and edit the style further to your liking. Read more about Borders and Shading below for tips on editing the style of your tables in word.
Borders
Borders refer to the four walls around a cell. They are styled in 3 ways:
- Thickness
- Color
- Line style (solid, dots, dashed, etc.)
This walkthrough will cover two ways to edit a border: Quick change and the Borders & Shading Console.
Quick Change
To change a border of a single cell or a group of highlighted cells, navigate to the Table Design tab. The Borders section of the ribbon contains the following elements:
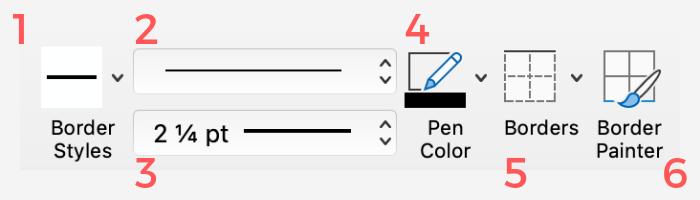
| 1 | Border Styles | This is a quick-pick sampler of border styles based on your document styles. |
| 2 | Line Style | Select the style of the border line you want to use. |
| 3 | Thickness | Selected by pixels (also known as “weight”). |
| 4 | Pen Color | The color of the border. |
| 5 | Borders | Which side of the cell you want to add/remove/change. |
| 6 | Border Painter | A tool that allows you to hand-select the border you want to change based on the settings you select in the ribbon. |
Borders & Shading Console
For more control over the design and style of borders in the table, click the Borders… drop down arrow and select Borders and Shading…
This window will appear:

From this window you can select the table, cells, or page for which you wish to add a border. The border buttons around the diagram on the right will engage or disengage a style you’ve created on the left side of the window.
Shading
Shading refers to the color in the background of a cell. Using shading can be helpful for defining header cells or important data points.
Navigate to the Table Design tab. Click the Shading icon for a list of colors. The colors provided will be based on the set design style of the document. You can select a new color by clicking More colors… and then defining the color you want from the palate.
You can also access shading options by navigating to the Borders and Shading… window as described above in Borders.
Now some final touches…

Ready to take on more Tables? Read: Tables in Word: The Next Level!
