Microsoft Word

Tables in Word: The Next Level (Intermediate)

Tables in Word: The Next Level (Intermediate)

Disclosure: Guess what? Otters eat over 10 pounds of sashimi a day! To help offset the cost of food (and running this website), we receive a commission if you click on a link and purchase something.

This article will provide an overview of how to use some tables feature in Microsoft Word.  Specifically, this article will cover the following:

  • Header Rows
  • Cell Margins vs. Spacing
  • AutoFit & Distribution
  • Sorting Table Content
  • Splitting Tables

For more on creating and editing tables, read the first article in this series: Using Tables in Word.

Quick Note
This tutorial uses Microsoft Office on Mac. Office on Mac has slightly different functionality than Office for Windows. If you are using a Windows computer, the locations of settings may vary.

Header Rows

Header rows are the first row in a table if the content helps identify the data below it.  For example, if your first column includes foods, you would label the first row in your first column “Food”.

Table Header Row with a background color to make it stand out.

Repeating Header Rows

If your table overflows onto a new page, it is helpful to repeat the header rows at the top of the page.  This allows readers to identify column content without referencing a previous page.

You can set up your table to automatically repeat headers at the top of each new page for your table.

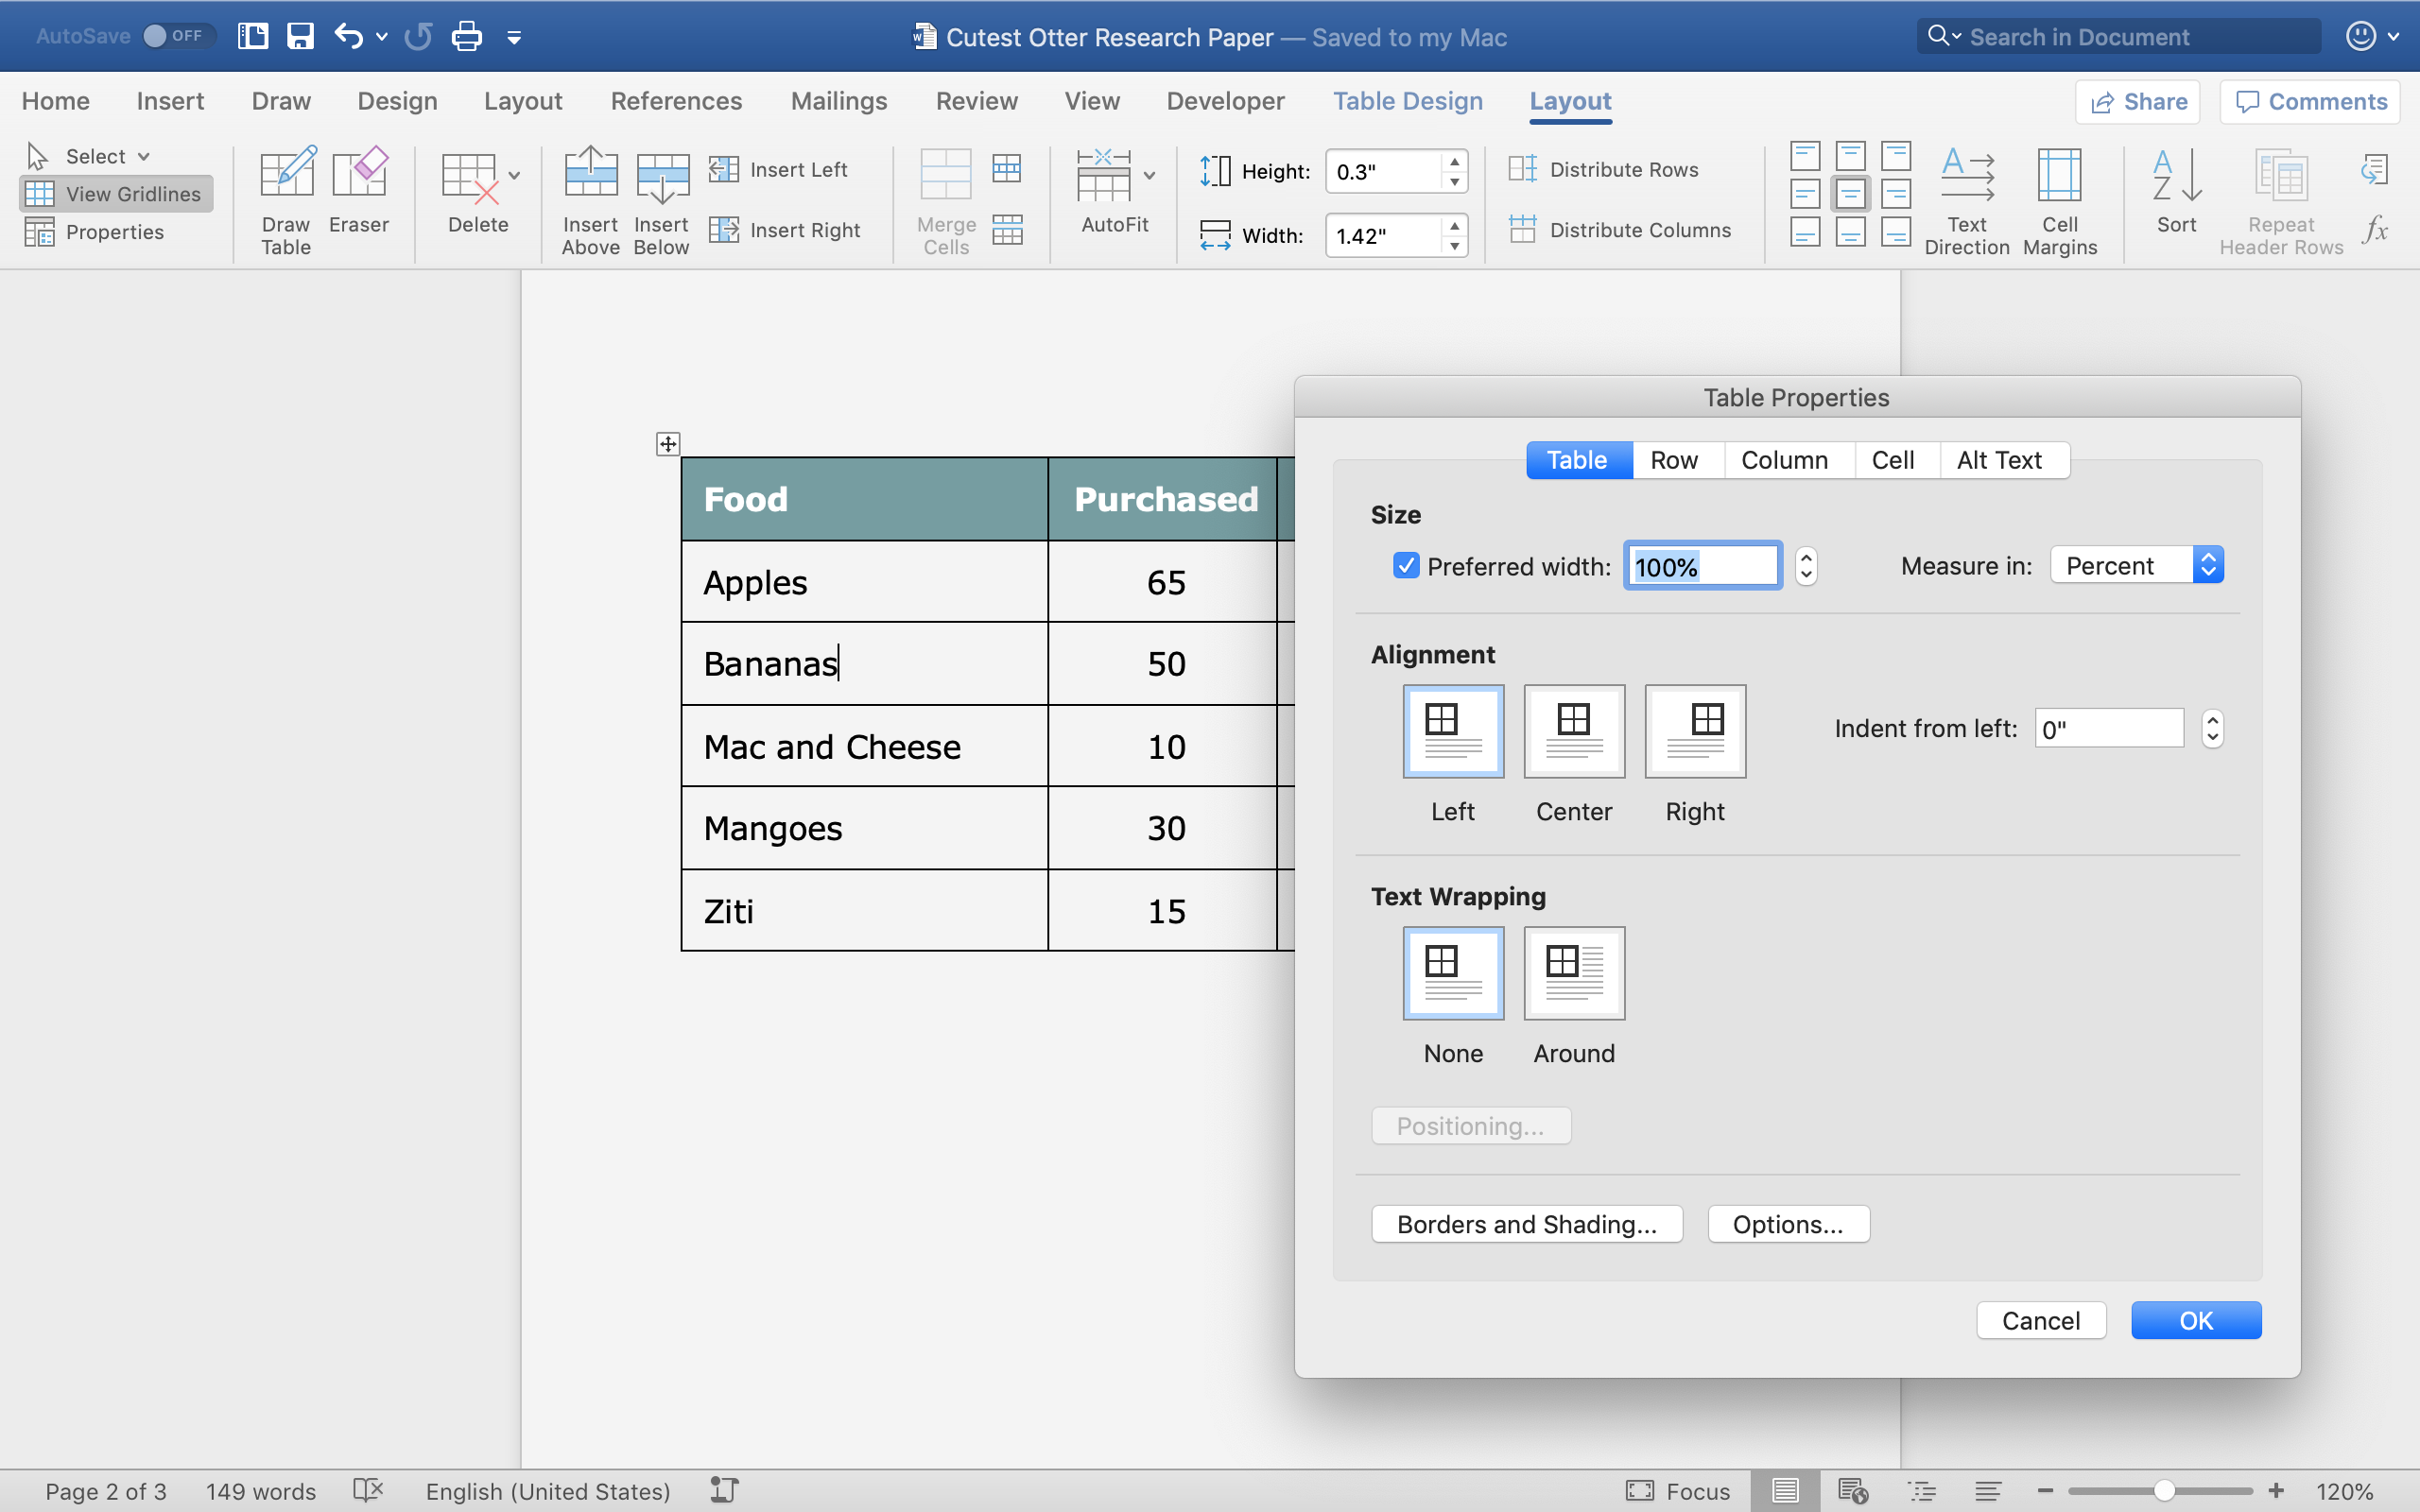
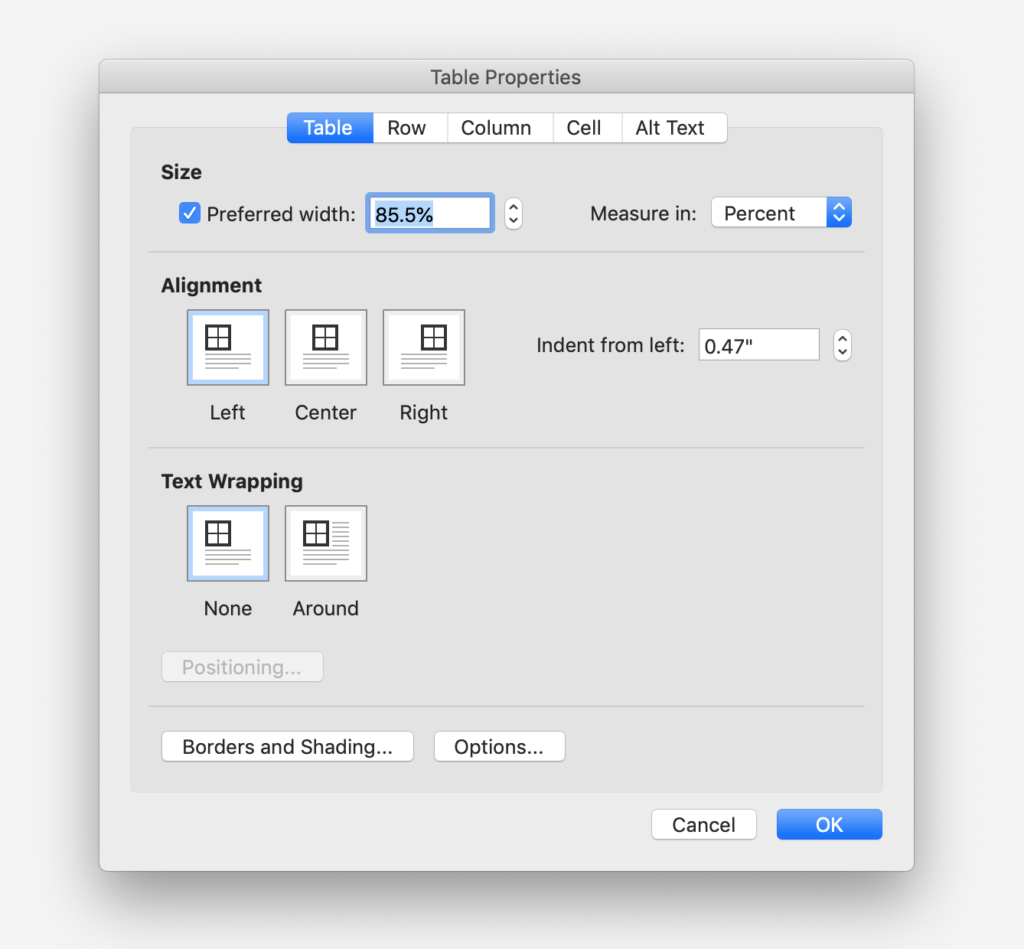
Put your cursor in a cell in the first row, or header row.  Navigate to the Layout tab and click Properties.  Click the Row tab at the top of the window.  Under the Options section, select Repeat as header row at the top of each page.

Tip
If your cursor is not located in the first row, the option for a header row will be unavailable. Navigate to the first row from this window by clicking the Previous Row button at the bottom of the window.

Cell Margins vs. Cell Spacing

In the previous article, we covered how to align content within a cell.  In this section, we will discuss how far away that content is from other content in adjacent cells.  For this, we use margins and spacing.

  • Spacing: The amount of space, in pixels, between cells.
  • Margins: The amount of space, in pixels, from the side of a cell wall to the content.
An example of cell spacing. Space between cells.
Example of cell margins. The margin of space between a cell wall and content.

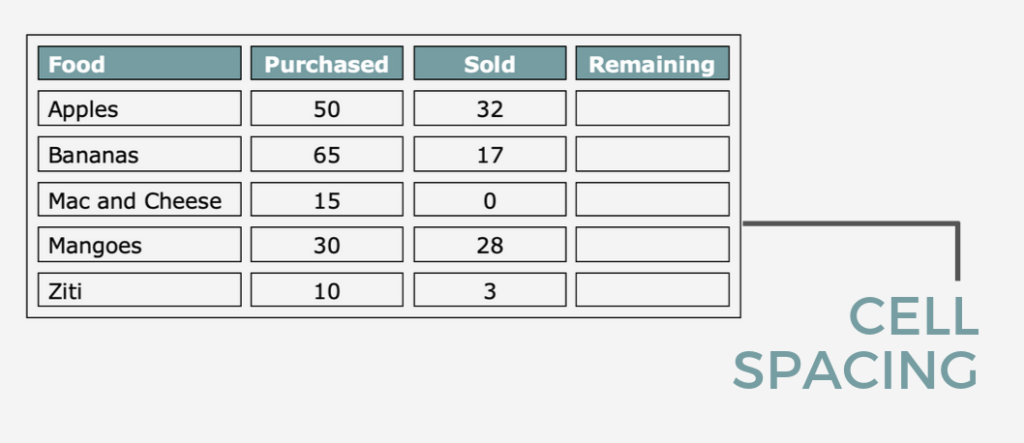
If you do not have any visible borders, the effect of these two can look identical.  Show borders to see the difference.

There are no rules for when to use one vs. the other.  Choose one or both of these features based on how you want the table, and the content of the table, to appear.

Adding spacing creates an even amount of space between all cells in the table.  Alternatively, use margins if you want to adjust a single cell.

Add Cell Spacing to Table

Place your cursor inside the table for which you want to add spacing.  

Click the Layout tab on your ribbon.

Click Cell Margins.

Make sure the Default Cell Spacing option is checked.  Type the desired spacing or click the up or down arrows to adjust the spacing.

Change Cell Margins in Table

Cell Margins can be changed universally across the entire table, or individually.  

To change cell margins for the whole table, navigate to the Layout tab, then click Cell Margins.

Under Default Cell Margins adjust the top, bottom, left, and right margins for the table.  Click OK.

To adjust the margins of an individual cell, make sure your cursor is inside the cell you wish to change. Navigate to the Layout tab, then click Properties.  

Table properties window
Table Properties Window
Tip
You can also access this window with a 2-finger click (the Mac version of right-click) and selecting Table Properties…

At the top of the window, click Cell, then Options.  To adjust just the individual cell, uncheck the box next to Same as the whole table.  Then, adjust the top, bottom, and sides as desired.  

Click OK in this window, and OK in the Table Properties window to exit.

Auto-Distribute Rows and Columns

In the beginner’s guide, we covered how to resize column widths and row heights by dragging the border.  This can be frustrating if you are trying to resize all columns or rows to the same width or height.  

There are two ways you can adjust a table or column size with 1-click: AutoFit and Distribute.

AutoFit Table

Place your cursor in the table you wish to resize and navigate to the Layout tab.  Click the AutoFit button and you will see a drop-down with three choices:

  • AutoFit Contents: this adjusts all column widths so they are only as wide as the widest cell in each column.  Especially useful if you are trying to condense your table.
  • AutoFit Window: this adjusts the table so that it fits within the confines of the content margins.  
    • Example: if your page has a margin width of 1 inch on each size, and you resize the page to have 0.5 inches on each side, the table will remain the original size.  To make the table the same width as the page, use this feature.  It will keep the proportions of your columns.
  • Fixed Column Width: this turns off AutoFit so your table does not adjust to the page while you are working.
autofit contents in Word table
AutoFit Contents feature
autofit window feature for tables in word
AutoFit Window feature

Distribute Rows and Columns

This feature allows you to adjust the height of your rows, or width of your columns, so they are uniform.  

Highlight all rows or columns you wish to change.  Click Distribute Rows or Distribute Columns as applicable.

distribute column widths in word tables
Distribute Column Widths

You will notice that the size of your table does not change. Word takes the average of each height or width and distributes evenly.

After distributing, you can increase or decrease the size of cells using the height and width tools.

Sorting Content in a Table

You can sort the text within each column alphabetically, by date, or by number.  This can be beneficial if you want to display data from highest to lowest, by name, or most to least recent.

You will need to know two things about your table before you sort:

  • How many Columns your table has and which column you wish to sort.
  • If your table has a header row.
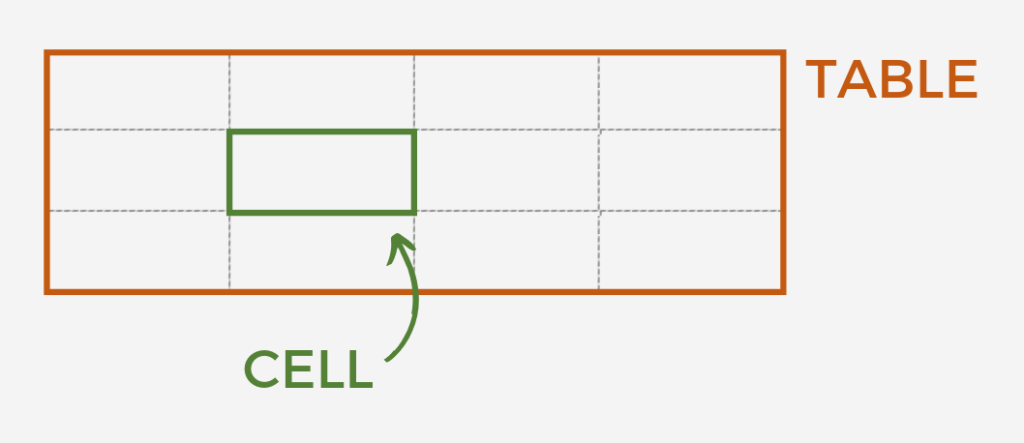
Counting Columns

Columns are counted from left to right.  The first column will be the one to the farthest left.  This is Column 1.  The second column will be directly to the right of the first column (Column 2), and so forth.

counting columns and rows in a table in word
Counting Columns and Rows

If you do not have a header row, you will want to know the number of the Column you wish to sort.

Header Rows

A header row is not part of the data below and always needs to remain on top.  You do not want to sort a header row or it will get mixed in with the rest of the data.

For more information on header rows, see the section above.

Sorting

Make sure your cursor is in the table you wish to sort.  Then, navigate to the Layout tab and click Sort.

This will bring up the Sort window.  

Sort window in word
The Sort Window in Word

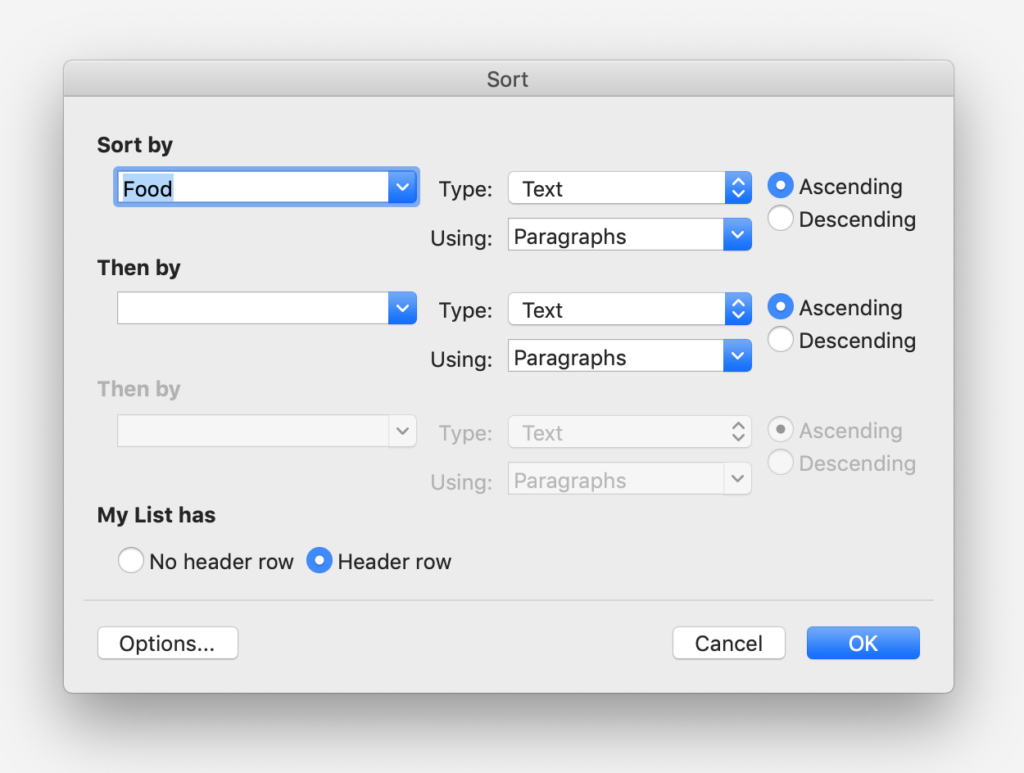
If you have a header row, under the option My list has… select the radio button for the Header row.  Making this selection will change your options in the first dropdown.  

By selecting “No header row”, columns will be listed by number.  All rows in that column will be subject to sorting.

Select the column you wish to sort under the Sort by… section.  Then, select the type of content (text, number, date).  

Finally, define whether the content is ascending or descending (such as A-Z or Z-A).  

Sorting a column will move the entire row as well.  If your food column has Apples, and the next column is the number of apples purchased in a week (65), sorting apples to the top of the table will move the 65 along with it.  Rows stick together.

sorting a table column in word
Sorting a column

Splitting a Table in Word

Splitting a table means dividing a table into two separate tables with a space of text between the two tables.  

Splitting is helpful if the content is better represented by two tables.

You can only split a table horizontally between rows, not vertically.  Before splitting next to a cell, place your cursor in the row you want to be the last row in the first/top table.  This will make the row below it the first row in the second/bottom table.

The Split Table function is in the Layout tab, next to the Merge Cells and Split Cells options.  

Split table icon
Split Table Icon

Once you split a table, you can edit each table individually.  

With these tips, you are going to be the Word-wizard your company was looking for!

Interested in more advanced features, like converting text to tables or adding formulas? Let us know in the comments below.

Posted by Amanda Parsons in Tutorials, 0 comments
Creating Tables in Word: The Basics

Creating Tables in Word: The Basics

This article provides an overview of how to use the tables feature in Microsoft Word.  Specifically, this article will cover table elements, adding tables, adjusting and editing table sizes and cells, alignment, and table design.  

By having a better understanding of how table elements function, you should be able to create, edit, and troubleshoot table errors.

Quick Note
This tutorial uses Microsoft Office on Mac. Office on Mac has slightly different functionality than Office for Windows. If you are using a Windows computer, you will still benefit from understanding how tables work, but any included screenshots or locations of settings may vary.

What is a Table?

A table is a grid that you can put content (text, images) into.  The primary reason for using tables is to format the content into a specific shape – such as aligning text.

Important Vocabulary:

Table – A rectangular grid made up of multiple cells.

Cells – Individual blocks for which text or images can be placed.  Together, cells make up a table.

Table and cell outline

Columns – Continuous line of cells running vertically.  The number of cells across a table indicates the number of columns.  Each column is only one cell wide.

Rows – Continuous line of cells running horizontally.  The number of cells up and down a table indicates the number of rows.  Each row is only one cell tall.

Columns vs Rows Gif
This table has 4 Columns and 3 Rows.

Word vs. Excel

Use tables in Word for organizing content visually. Tables help align text and images in a way that makes it easy to read and creates awesome layouts.

However, if you are interested in using a table for accounting, or to hold data for which you plan to make graphs, I recommend using Excel.  The mathematical properties in Microsoft Excel far outweigh the capacity of a Word table.  

Depending on your goal, you can create a database in Excel and then import it into Word. The new table will have similar editing functionality as other tables in Word.

How to Add Tables in Word

When adding a table to a Word document, it is less important to know how many columns and rows you need and more important to know where you want to put the table.

Place your cursor in the location you wish to place the table.  

Pro Tip
I recommend having at least one line of text (or a space where text could go) below where you are placing the table. This will make it easier to add text later.

In your Ribbon click the Insert tab.  This will bring up all the elements you can insert into your document.

Click the Table button.  This will bring a drop down that allows you to select how many rows and columns you want in your table.  Use your mouse to highlight the number of cells you want in your table.  You can see the size at the top of the grid (the first number is columns, the second number is rows).  

Alternatively, you can click Insert Table below the grid and directly enter the number of rows and columns you want for your table.

Adding a table in Microsoft Word

Tables will default to the width of the page or available space.  They will be inserted “In Line”, meaning there is text above and below, and the table moves with the content on the page.  

Columns will default to be evenly spaced.  Rows will default to be evenly spaced and the height of the body font in the document. 

A new table will have no formatting, except for a black border between all cells and around the outside of the table.  

New Table Elements

What are the boxes outside the table? Once a table has been inserted into your document, you will notice two boxes outside of the table.  

The first box is in the upper left-hand corner of the table and has a cross of arrows.  Clicking and holding this box will allow you to move the table to another part of the document.

The second box is in the bottom right-hand corner of the table.  Clicking and dragging this box will allow you to resize the table.

Gif of moving and stretching a table in Microsoft Word.

Adding Content to a Table

Now that the table is created, it is time to add content to the table.  

In the example below, I am making sure to add headers to each of the columns, as well as categories in the rows.  

You can also add images to the inside of a cell by making sure your cursor is placed inside the cell you want to add the image to and then clicking the Insert tab, followed by Media.

Adding More Cells, Rows, and Columns

Let’s say I start adding my content and then I realize – I forgot to create a row for the outcome of my chart!

Adding cells is relative to the position of your cursor, so it is important to place your cursor in the correct cell.

In this circumstance, I want to create another row at the bottom of my current table.  

Place the cursor in the bottom row.  Then, double-click (right-click equivalent on a Mac) and there is a pop-up selection panel.  

Hover over Insert, then select Rows Below.  This will add one row below the row in which my cursor is placed.

Adding a row to the bottom of a table.
Pro Tip
There is an easier way to add another row to the bottom of the table. Place your cursor at the end of the content/text in the last cell in the last row, then hit ‘Enter’ on your keyboard. A new row will appear!

If you want to add a row between two rows, place your cursor in one of the adjacent rows and select ‘above’ or ‘below’ as desired.

The same process can be used to add columns to a table.

Deleting Cells, Rows, and Columns

To delete a cell, row, or column, first place your cursor in the location of the cell, row, or column you wish to delete.

If you just want to delete the contents of a cell, highlight the cell and press the Delete button on your keyboard.  

Otherwise, double-click on a cell and select the option Delete cells…
You will see a pop-up window that asks how you want to delete the cells.

You have four options:

  • Shift cells left – This removes just one cell and moves all the cells in the row to the right of it to the left.  It will cause a different number of columns in that row compared to the other rows in the table.
  • Shift cells up – This removes just one cell and moves all the cells in the column below up one.  It will cause a different number of rows in that column compared to the other columns in the table.
  • Delete entire row – Removes an entire row in the table.
  • Delete entire column – Removes an entire column in the table.

Adjusting Table Size

As mentioned above, clicking and dragging the bottom, right-hand, box will reshape the entire table, keeping the cells evenly distributed.  This is the best way to adjust a table width without distorting a single column.

Here are more ways to shape tables in Word.

Resizing Entire Column

Columns can be resized individually by clicking on the border between the columns and dragging from side to side.  Wait for the cursor to turn into two vertical lines with arrows facing away from each other. Then, click on the border and move your mouse to resize.  

If you want to resize a column to a specific width, highlight the column and navigate to the Layout tab in the Ribbon.  Click Cell Size drop down and enter the exact width in the provided fields.

Resizing Individual Cell Width

Unlike Excel, tables in Word allow you more flexibility for resizing individual cells.

To resize the width of a column for only one row, highlight at least one cell adjacent to the cells you are trying to resize.  Then, follow the same instructions as above.

Resizing Columns in Word Tables

Redistributing Width of Multiple Columns

To resize some of the columns so they are all the same width, use the Distribute Columns tool.

Highlight the columns you want to be the same width.  In the Ribbon, navigate to the Layout tab.  Click Cell Size drop down and select Distribute Columns.  

Distributing Columns in a table in Microsoft Word.

Resizing Entire Row

Similar to the instructions above, rows can be expanded upon individually or as a group.

Resizing Individual Cell Height

Unlike Columns, Row heights cannot be adjusted individually by cell.  Cells in a single row will always be the same height.

Redistributing Width of Multiple Rows

Use the instructions above for columns, changing out rows as highlighted and selecting Distribute Rows.

Merging and Splitting Cells

Not all tables are an exact grid and you may need to combine or separate cells.  Merging cells is when you select multiple adjacent cells and make them one cell.  Splitting cells is when you take a single cell and divide it into multiple columns or rows.

To merge cells, first highlight the cells you wish to merge.  Cells need to occur in the same row and/or column and be adjacent to each other.  

Then, under the Layout tab, select Merge.

Merging Cells in table in Microsoft Word

To split cells, place a cursor in the cell you wish to split.  Under the Layout tab, select the Merge drop down and click Split Cells.  A pop-up window will appear asking you how many rows and columns you would like to split the cell into.  Enter the desired numbers and click okay.

Splitting cells in tables in Microsoft Word

Cell Alignment

The alignment inside a cell refers to how the text and/or images display in relation to the inner walls of the cell itself.  

There are nine (9) different alignments within a cell based on two directions: side to side, and up and down.

Options for the vertical and horizontal alignment of content in a cell.

As you can see in the image, cell content can be aligned to the right, left or center of the cell, as well as to the top, middle, or bottom of the cell.

Cell alignment can be set individually; cells of different alignment can be contained in the same table.

To set the alignment of a cell, simply place your cursor in the cell you want to change (or highlight multiple cells you wish to change together) and navigate to the Layout tab.  Click the Alignment drop down and select your desired alignment.

cell alignment in tables in microsoft word

Cell margins and cell spacing can also play a role in how content is aligned.

Table Design

This is definitely the fun part of creating a table.  Creating tables in Word is all about making your content easy to read. This is where design comes in.

Preset Styles

The easiest way to style your table is to use one of the prebuilt table designs provided by Word.  With a variety of styles, you can find something with helpful shading, header styles, and more!

To use a preset style, start by making sure your cursor is placed inside the table.  Navigate to the Table Design tab.  The options for preset styles is located in the band on the top.  You can view more designs by clicking on the arrow button that appears to the left of the styles, or the down-arrow tab to open up all options.

Table Design Presets in the Ribbon.
Table Design Presets; expanded for more options.

Click on a style you like to see it in action.  Don’t like it?  Click the Undo button or click Command+Z on your keyboard.  Or, just select another style.

Note: Presets will override existing styles or cell alignment.

You can also take a preset style to get you most of the way and edit the style further to your liking.  Read more about Borders and Shading below for tips on editing the style of your tables in word.

Borders

Borders refer to the four walls around a cell.  They are styled in 3 ways:

  • Thickness
  • Color
  • Line style (solid, dots, dashed, etc.)

This walkthrough will cover two ways to edit a border: Quick change and the Borders & Shading Console.

Quick Change

To change a border of a single cell or a group of highlighted cells, navigate to the Table Design tab.  The Borders section of the ribbon contains the following elements: 

1Border StylesThis is a quick-pick sampler of border styles based on your document styles.
2Line StyleSelect the style of the border line you want to use.
3ThicknessSelected by pixels (also known as “weight”).
4Pen ColorThe color of the border.
5BordersWhich side of the cell you want to add/remove/change.
6Border PainterA tool that allows you to hand-select the border you want to change based on the settings you select in the ribbon.

Borders & Shading Console

For more control over the design and style of borders in the table, click the Borders… drop down arrow and select Borders and Shading…

This window will appear:

Borders and Shading window in Microsoft Word.
Borders and Shading Window

From this window you can select the table, cells, or page for which you wish to add a border. The border buttons around the diagram on the right will engage or disengage a style you’ve created on the left side of the window.

Shading

Shading refers to the color in the background of a cell.  Using shading can be helpful for defining header cells or important data points.

Navigate to the Table Design tab.  Click the Shading icon for a list of colors.  The colors provided will be based on the set design style of the document.  You can select a new color by clicking More colors… and then defining the color you want from the palate.

Shading tables in microsoft word

You can also access shading options by navigating to the Borders and Shading… window as described above in Borders.

Now some final touches…

It’s a Tie! I mean, come’on. They are both so cute.

Ready to take on more Tables?  Read: Tables in Word: The Next Level!

Posted by Amanda Parsons in Tutorials, 0 comments
Create a Custom Style Theme in Microsoft Office (Mac)

Create a Custom Style Theme in Microsoft Office (Mac)

Maybe you want to to add your brand to your work files.  Maybe you just want a consistent theme for all your documents. 

Regardless of your reason, these instructions will help you create a one-click, style theme for your document that allows you to set the font, colors, size, and structure of headings and body text.

Read: Why should you brand your work documents?

Alright, I’m going to admit something here: creating a custom style theme in Microsoft Office is a lot easier on Windows.  On a Mac, you will need both Word and PowerPoint installed to complete a theme set up.

Step 1: Design Your Theme

In order to know what to set your fonts and colors to, we recommend creating a theme layout.  By outlining your theme ahead of time you will be able to ensure your theme looks good.

Theme Kit

Use this Office Styles Theme Kit to get started designing.

Once you have downloaded the template, highlight each section (headers, paragraphs) and edit the font, size, and colors to match the look you are going for.

Step 2: Set Your Theme Colors

Setting theme colors doesn’t automatically set your font colors, but it will help you select from chosen colors in a document when you need to.

  1. Open PowerPoint
  2. Create a new Blank presentation
  3. In the top menu, select “Format” and then “Theme Colors

From the Create Theme Colors window, this is the fun part.  Start plugging in all your colors!

Want some tips on which colors should go in which block?  Adobe Spark has a great article on 3 steps to picking your brand colors.  Make your primary or neutral your Accent 1 choice. 

Pro Tip
Plug in your colors by frequency of use, making your less used accent colors the ones toward the bottom of the list.

Text/Background Colors

If you are just starting out in the realm of branding, we recommend leaving these light and dark colors alone.  You can play with making a “light” background something other than white (grey, ecru, eggshell?) but make sure your text contrasts in color – like black or dark grey or blue. 

Get some color help!

Coolors.co Homepage

If you are setting up a new color scheme (not using your established company’s brand), try using Coolors.co.  It is a cool way to pick out colors for your theme or new brand.

Once you have selected colors, be sure to record both the Hex code (format: #000000), RBG (for computer and web), and CYMK (for print).  You can then use hex or RBG to accurately set colors in Office Themes.

Step 3: Set Your Fonts

Setting fonts can be done in Word.  If you downloaded the Office Styles Theme Kit above, open up this file to quickly add your fonts to your theme.

Start by pulling in your new custom colors to make selecting easier.

Change the theme fonts to match your brand and style.

Step 4: Saving Your Theme

Save your style as a specified font style, such as “Header 1”. 

Highlight the text you want to save as a style.  In the styles pane right click (two-finger click on Mac) the style you want to replace, such as header 1.  On the drop down, select “Update Header 1 to Match Selection”.

All other text assigned as “Header 1” will automatically be updated to match.

Continue this process until you like the look of all your font styles.  

Once you are done designing your fonts, save the styles and colors to a theme so you won’t ever have to do it all again!

Under the Design tab, select the Themes drop down.  At the bottom, select “Save Current Theme”.  Be sure to name your theme by your company or brand so you won’t forget which one it is.

That’s it!  Now you are all set to get creative and set a theme you can use over and over again.

Photo by Jeroen den Otter on Unsplash

Read These Next:

Posts not found

Posted by Amanda Parsons in Tutorials, 0 comments
4 Reasons Why Document Design Is Key to a Promotion

4 Reasons Why Document Design Is Key to a Promotion

If you work in marketing or graphic design, you may already be on top of making sure your documents to the public are brand consistent.  But what about those of us who aren’t skilled marketers?  Do the documents we write for internal use also need to incorporate company design?

The short answer is: Yes.  Even if the documents you produce are technical specifications, software support instructions, or a memo on new standard operating procedures (SOP).  If someone other than you will ever read the documents, there better be design elements.

Why Add Design?

Whats the big deal, anyway?  Isn’t it the content that matters?  Well, here are four reasons why design should be an important consideration in all your internal documents (and how it can help your career down the line!)

Your Team Is People Too

You just spent hours working on a new software manual that will make your team’s lives easier – if they read it.  Weighing in at 20-pages, you call it comprehensive, but they see it as a burden. 

Now you want to avoid the inevitable: all your coworkers asking you for help instead of using the resource.

There is a reason why sales strategies focus on imagery and bold colors.  You have a product that can help people, but first they need to see it.  Good design helps grab people’s attention and can make a product both valuable and accessible.

Your coworkers are people too, and the same strategy applies.  With busy work-lives of their own, humans tend to look for the quickest solution – and that may not include reading a dry manual.

Make your document inviting by incorporating design elements such as white-space, screenshots, and color-coded sections for quick scanning.  Your team will be more likely to use it, and appreciate the work you put into the resource.

Management Doesn’t Have Time

Does this sound familiar? Your boss asked you to write up a memo on new standard operating procedures to help streamline the department. 

Like the overachiever you are, you carefully crafted a beautiful document outlining all elements of work priorities in the office and emailed it over to your boss for review.

The only problem is, a few weeks have gone by and you haven’t heard anything.  You can admit that you may not receive a trophy for MVP (Most Valuable Protocol), despite practicing your acceptance speech in the shower.  But you at least expected the memo to be released to the team for implementation.  What happened?

The truth is, when you sent the SOP back to your boss, it put the ball in their court to sell it to the department.  They may only get one chance to ask the team to follow these procedures.  Management doesn’t have time to try to convince everyone to read the document and follow the rules.  They may not even have time to *gasp* read the document itself!

Make your boss’ job easier by making them feel confident the document you created will be an easy sell to the team. 

Include the company logo and company colors so it looks official.  Then, add the name of your boss to the authorship so they feel a sense of “buy-in” on the document.

Quick Tip: How to Add Your Company Brand to Word Themes

Get Your Board On Board (if you have one)

If your organization has a board of directors, chances are they don’t necessarily see the daily ins and outs of what you do.  In fact, most boards rely heavily on the information provided to them by staff and management in order to understand the direction of the organization at a micro-level. 

Sometimes you may need to “sell” your work to a board – and approval isn’t always forthcoming.

The board’s job will be easier if you use design to demonstrate how your documents are consistent with the message they already believe in (your organization brand).  When a new piece of work comes their way, they are more likely to approve it, knowing it showcases the best interest of the organization.

Branding Makes You a Company Leader

While those technical specifications you put together did a great job showcasing your efforts, do they present you as a company leader?

Leadership at your company means considering how you live up to the values of your organization and meet company-wide goals.  From the bottom up, everyone can relate to how they improve the company – otherwise you wouldn’t have a job!

Take your tech specs, for example.  You may think your document is just an internal guide to development, but that project demonstrates leadership if you visually link it back to the company.  This lets management know you are producing with the company’s best interest in mind.

Plus, don’t be shy about bringing that up during your performance review!

How to Design “Everyday” Documents

Maybe you are thinking – this is all well and good, but how am I suppose to vamp up a boring document outlining hiring procedures?  Often the documents we use “every day”, or internal documents, can go unnoticed.  Follow these quick steps to make a big difference.

Brand the Document

You may need to check with your marketing department (sometimes referred to as “the intern”) but they will probably be more than happy to supply you with company branding guidelines. This is a document that specifies colors, fonts and the proper way to display a logo for the organization.

Quick Brand Guide

Create a custom style theme in Microsoft Office by using this branding template.

Using these guides, simply change the font and colors theme of your document so that it matches your company brand. Make your job even easier by creating a custom theme in MS Word. This step can make a world of difference.

Include Pictures

If your document contains instructions then pictures of those steps are a must.

Creating a “how-to” guide for using the new software program? Include screenshots of the steps you want people to take.

Streamlining warehouse procedures for stocking? Add photos of the locations you want to highlight so people know what to look for.

This step can be tricky with something like a departmental update, but it doesn’t mean pictures aren’t valuable.  Instead, include Smart Art (Word, Publisher) or graphs to help illustrate your point.

If you have an entire page of text, try to find a stock photo that represents the theme and add it to a corner. This simple step can help readers remember the text on the page, and it serves to break up the monotony.

Divide Your Content

Ever read an “Idiot’s Guide To…” book? Notice the call outs on the side of the page, or a box along the bottom with a tip or idea? This is a way to divide your content so it isn’t all contained in paragraph after paragraph.

Think about any asides you have mentioned. These usually start with a sentence like:

  • “On the rare occasion…”
  • “Don’t forget to…”
  • “For more details, check out…”

In these circumstances, pull the paragraph from the rest of the document, simplify the text, and add it to a call out box on the side of the page. It will get the attention it needs and help shorten the rest of the text.

Now you can create documents that help showcase the brilliant content you already spent so much time writing.  Your team will appreciate it, and so will your boss.  Keep an eye out for a promotion soon!

Photo by Kelly Sikkema on Unsplash

Read These Next:

Posts not found

Posted by Amanda Parsons in Career, Tutorials, 0 comments